Diving into the Web
You will learn how the web works in this hands-on session.
Table of Contents
- Step 1. Preparation
- Step 2. Run Your Own Web Server
- Step 3. Run Your Own DNS Server
- Step 4. Clean Up
- See Also
Step 1. Preparation
In this session, we assume that you are using macOS and connect to NAIST Wireless LAN (mm2010).
Open the terminal and install telnet, git, iproute2mac, python2, python3, and Wireshark using Homebrew:
$ brew install telnet git iproute2mac python2 python3
$ brew cask install wireshark
Install virtualenv for Python 2:
$ pip2 install virtualenv
Step 2. Run Your Own Web Server
Open a terminal and enter:
$ git clone https://github.com/y-sira/httpyd.git
$ cd httpyd
$ python3 -m venv venv
$ source venv/bin/activate
$ pip3 install netifaces
Check the IP address on the interface en0:
$ ip addr show en0
en0: flags=8963<UP,BROADCAST,SMART,RUNNING,PROMISC,SIMPLEX,MULTICAST> mtu 1500
	ether f0:79:60:1d:3f:42
	inet6 fe80::186f:f069:67ba:7ed1/64 secured scopeid 0x4
	inet 163.221.126.68/22 brd 163.221.127.255 en0
The IP address is 163.221.126.68 in our environment and we will use this IP address in this guide. On your laptop, the IP address may be different. Please be careful.
Then, start your web server:
$ sudo ./httpyd en0
Listening on 163.221.126.68:80...
Your web server will be running on the IP address 163.221.126.68 with the port 80.
Open a new terminal window and access your web server using telnet and type GET /:
$ telnet 163.221.126.68 80
Trying 163.221.126.68...
Connected to mm-dhcp-126-068.naist.jp.
Escape character is '^]'.
GET / ⏎
HTTP/1.0 200 OK
Content-Type: text/html

<html>
  <head>
    <title>It works!</title>
  </head>
  <body>
    <h1>It works!</h1>
    <p>This is the default web page for this server.</p>
    <p>The server is running on 163.221.126.68:80
       and you are from 163.221.126.68:64981.</p>
  </body>
</html>
Connection closed by foreign host.
Access your web server http://163.221.126.68 using the web browser (e.g., Google Chrome):

Make sure that your friends can access your web server with http://163.221.126.68.
Observation with Wireshark
Open Wireshark and start packet capture on both of the Wi-Fi interface en0 and the loopback interface lo0 as follows:
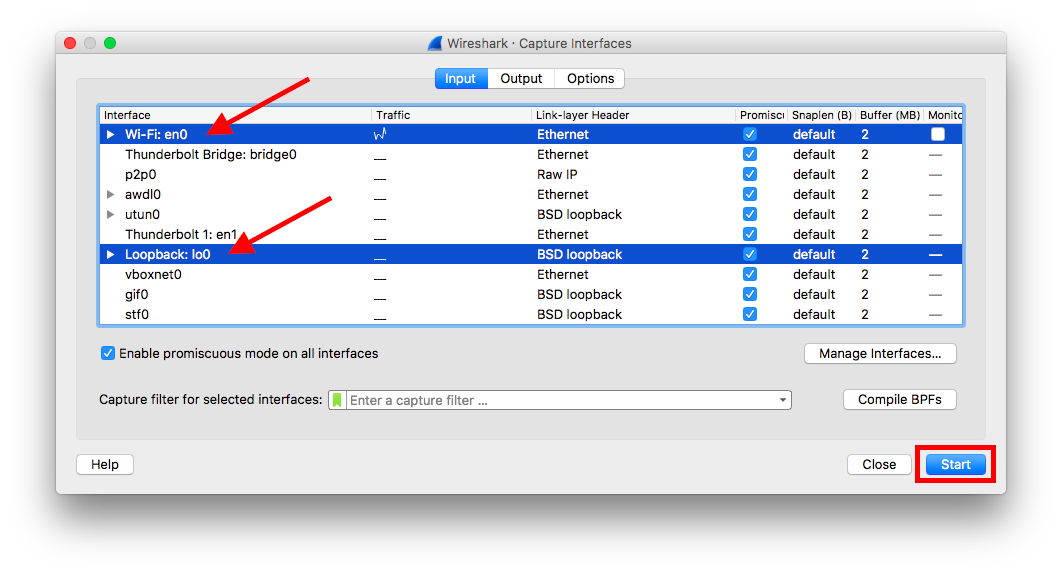
Access your web server http://163.221.126.68 again using the web browser, then stop packet capture. You can see the HTTP request/response packet like the images below:


Considerations
- Which is used as a transport layer in the script, TCP or UDP? Why?
- What is “GET /” in the request packet?
- What is “200 OK” in the script?
- What is “Content-Type: text/html” in the script?
- Can we use any port number for the web server? How can we access?
- (Optional) How is the actual web server (e.g., Apache, NGINX, …) transferring files?
Step 3. Run Your Own DNS Server
Open new terminal window and enter:
$ mkdir dnsserver
$ cd dnsserver
$ virtualenv venv
$ source venv/bin/activate
$ pip2 install twisted
Create a new file named 1751055.internet-eng-2018.test replacing 1751055 with your student ID and 163.221.126.68 with your IP address as follows:
zone = [
    SOA(
        # For whom we are the authority
        '1751055.internet-eng-2018.test',
        # This nameserver's name
        mname = "ns1.1751055.internet-eng-2018.test",
        # Mailbox of individual who handles this
        rname = "root.1751055.internet-eng-2018.test",
        # Unique serial identifying this SOA data
        serial = 2018072001,
        # Time interval before zone should be refreshed
        refresh = "1H",
        # Interval before failed refresh should be retried
        retry = "1H",
        # Upper limit on time interval before expiry
        expire = "1H",
        # Minimum TTL
        minimum = "1H"
    ),
    A('1751055.internet-eng-2018.test', '163.221.126.68'),
]
Create a new file named resolv.conf including two DNS servers provided by NAIST as follows:
nameserver 163.221.8.11
nameserver 163.221.8.12
Then, start the DNS server locally:
$ sudo twistd -n dns --resolv-conf resolv.conf --pyzone 1751055.internet-eng-2018.test
2018-07-18T18:34:45+0900 [-] ./resolv.conf changed, reparsing
2018-07-18T18:34:45+0900 [-] Resolver added ('163.221.8.11', 53) to server list
2018-07-18T18:34:45+0900 [-] Resolver added ('163.221.8.12', 53) to server list
Open a new terminal window and make sure that you can resolve 1751055.internet-eng-2018.test using dig specifying the local DNS server running on 127.0.0.1:
$ dig +short 1751055.internet-eng-2018.test A @127.0.0.1
163.221.126.68
You can resolve example.com too:
$ dig +short example.com A @127.0.0.1
93.184.216.34
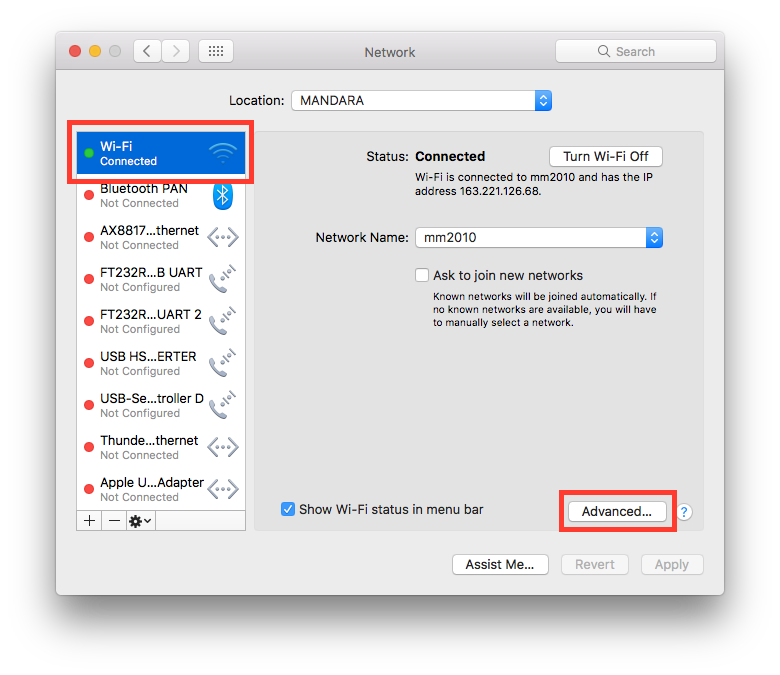
Then, apply your DNS server system-wide. Open System Preferences, select Network, select Wi-Fi, and click Advanced…:
Go to DNS tab, and configure as follows:
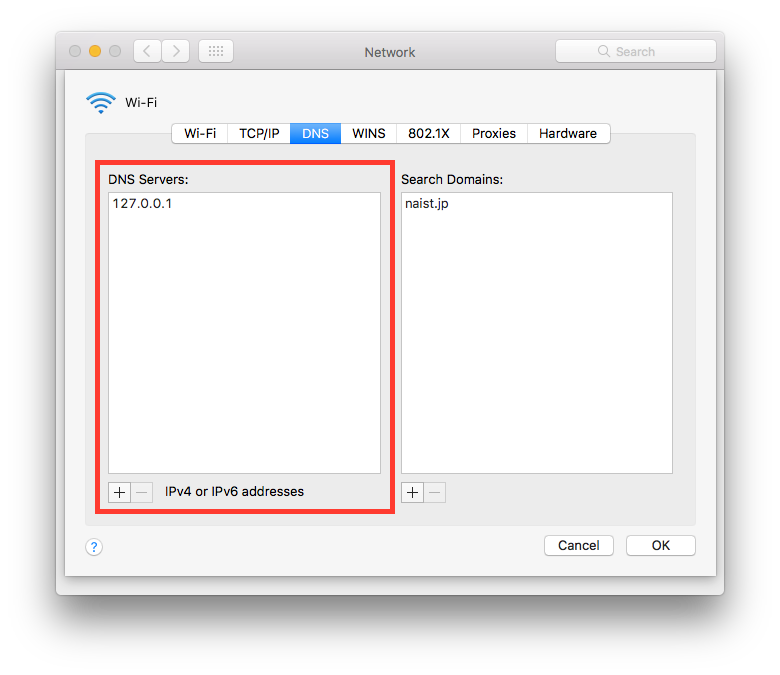
Then, click OK and Apply.
Now your system refer the local DNS server running on 127.0.0.1. Make sure that you can resolve any domain names:
$ dig +short 1751055.internet-eng-2018.test A
163.221.126.68
$ dig +short example.com A
93.184.216.34
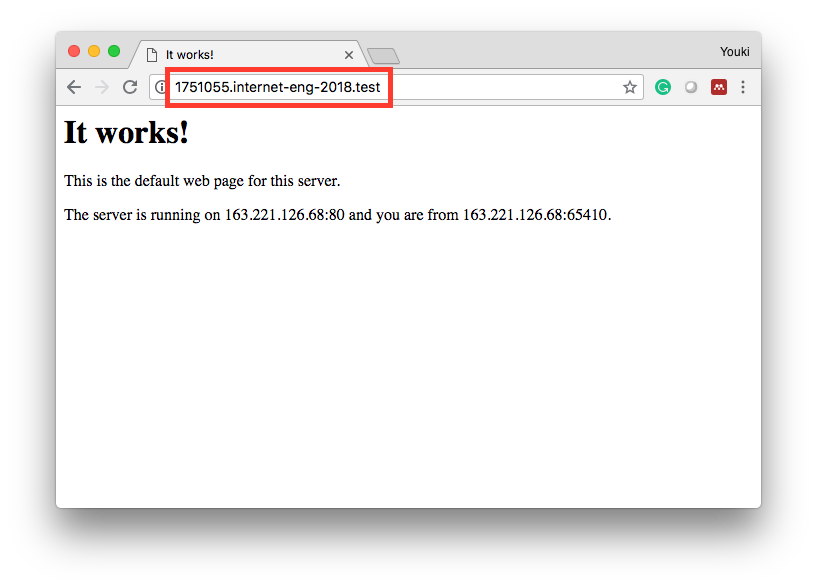
Now, you can access your web server with 1751055.internet-eng-2018.test.
Open the web browser and access 1751055.internet-eng-2018.test:
Next, stop the local DNS server and add your friend’s domain name and the corresponding IP address to the file 1751055.internet-eng.test as follows:
@@ -18,4 +18,5 @@
         minimum = "1H"
     ),
     A('1751055.internet-eng-2018.test', '163.221.126.68'),
+    A('xxxxxxx.internet-eng-2018.test', '163.221.yyy.zzz'),
 ]
Then, restart your local DNS server. Make sure that you can access your friend’s web server with the appropriate domain name.
Observation with Wireshark
Open Wireshark and start packet capture on both of the Wi-Fi interface en0 and the loopback interface lo0 as follows:
Resolve the domain name again:
$ dig +short 1751055.internet-eng-2018.test A
163.221.126.68
Then, stop packet capture. You can see the DNS request/response packet like the images below:
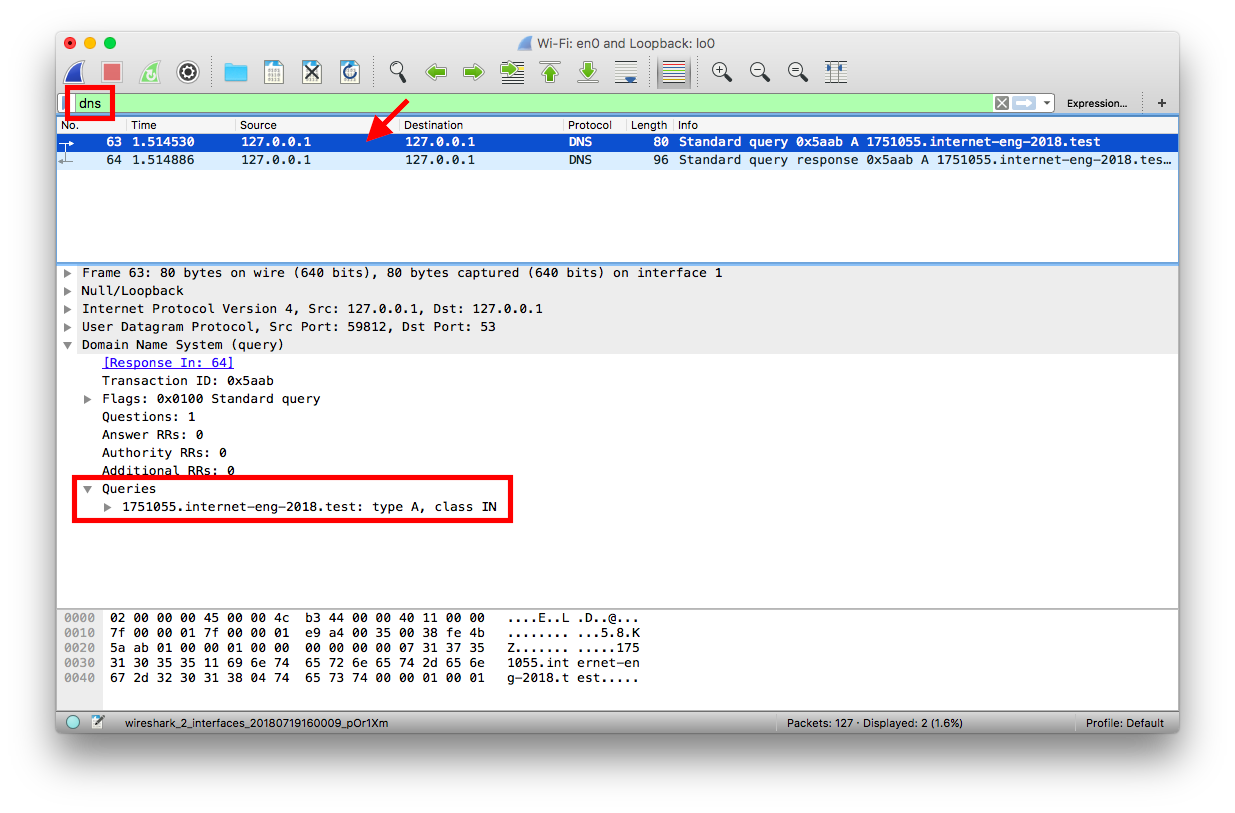
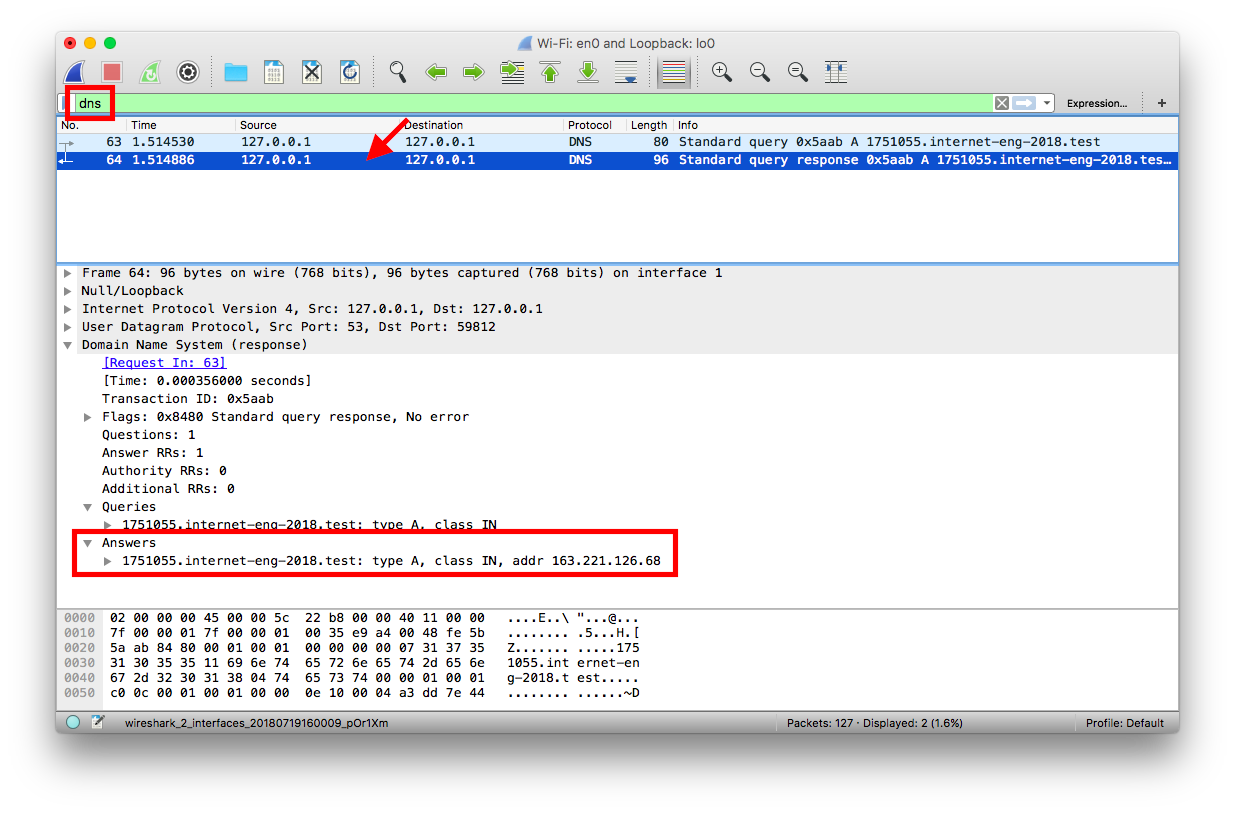
Considerations
- Which is used as a transport layer in the DNS server, TCP or UDP? Why?
- What is the “A record”?
- How can we resolve the domain with IPv6? Try to resolve using
dig.
- How can we resolve the domain with IPv6? Try to resolve using
- Try to resolve
example.comwithdigand capture the packets using Wireshark. Why does the your local DNS server query NAIST ITC DNS server?
Step 4. Clean Up
Open System Preferences, select Network, select Wi-Fi, and click Advanced…, go to DNS tab, and configure as follows:
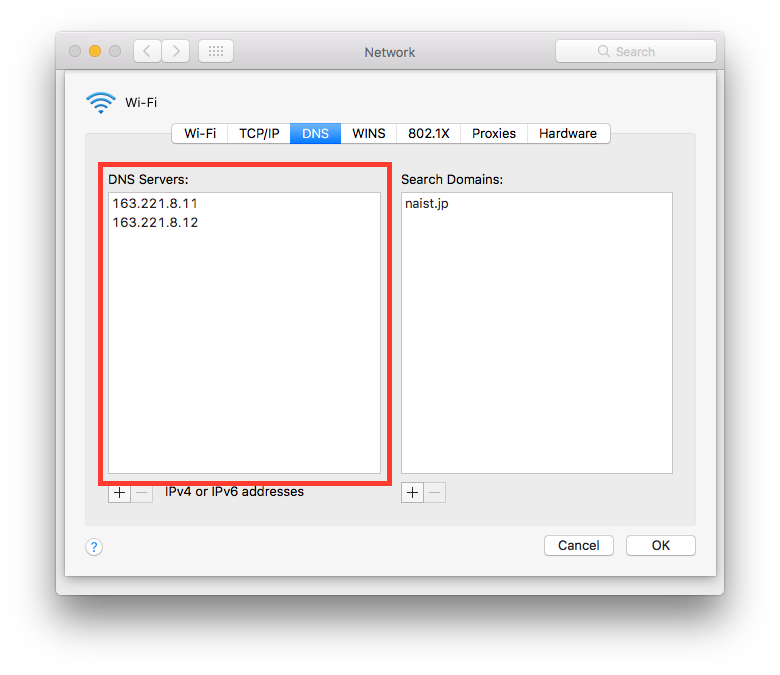
Then, click OK and Apply.
See Also
- RFC 2616 - Hypertext Transfer Protocol – HTTP/1.1. https://tools.ietf.org/html/rfc2616
- RFC 7540 - Hypertext Transfer Protocol Version 2 (HTTP/2). https://tools.ietf.org/html/rfc7540
- Welcome! - The Apache HTTP Server Project. https://httpd.apache.org/
- NGINX | High Performance Load Balancer, Web Server, & Reverse Proxy. https://www.nginx.com/
- BIND Open Source DNS Server | Internet Systems Consortium. https://www.isc.org/downloads/bind/
- IANA — Root Servers. https://www.iana.org/domains/root/servers
- AS Rank: AS7500 (WIDE Project). http://as-rank.caida.org/asns/7500
- Freenom - A Name for Everyone. http://www.freenom.com/