Monitoring with SNMP
Overview

In this hands-on session, you will query routers and monitor those states using SNMP. We assume the topology you created before and use the virtual machine we provided before instead of a VPCS in GNS3.
Step 1. Preparation
In this session, we will use both of VirtualBox and GNS3. Large computation resources are required for them. So, change the configuration of the virtual machine we provided before. The minimum memory size for Lubuntu is 512 MB, so:

Allocate one processor for the virtual machine:

Then, in order to install commands for SNMP from the Ubuntu repository, we need an internet connection. Enable the adapter 1 as a NAT:
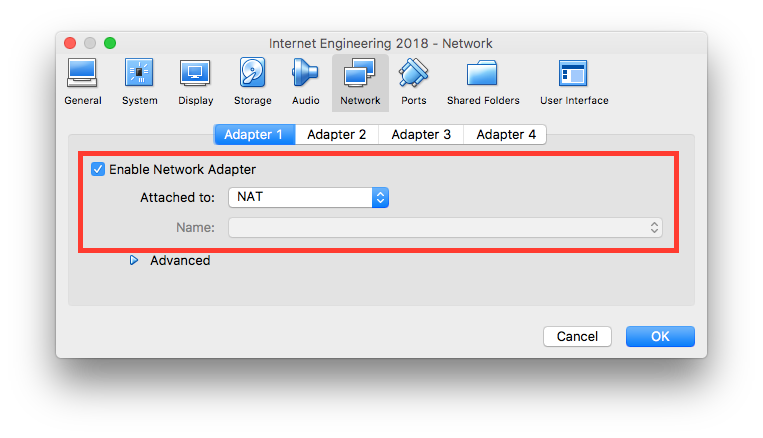
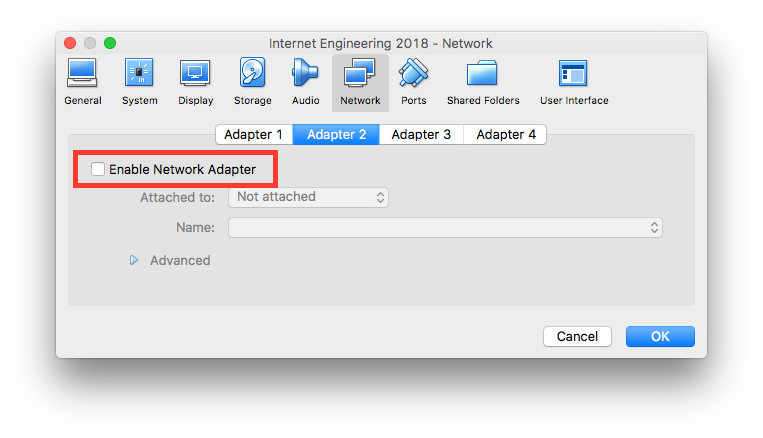
…and disable the adapter 2–4.
Next, start the virtual machine and install SNMP commands:
$ sudo apt install snmp snmp-mibs-downloader
/etc/snmp/snmp.conf says:
# As the snmp packages come without MIB files due to license reasons, loading
# of MIBs is disabled by default. If you added the MIBs you can reenable
# loading them by commenting out the following line.
So,
@@ -1,4 +1,4 @@
 # As the snmp packages come without MIB files due to license reasons, loading
 # of MIBs is disabled by default. If you added the MIBs you can reenable
 # loading them by commenting out the following line.
-mibs :
+#mibs :
Then, configure the static IP address as follows:
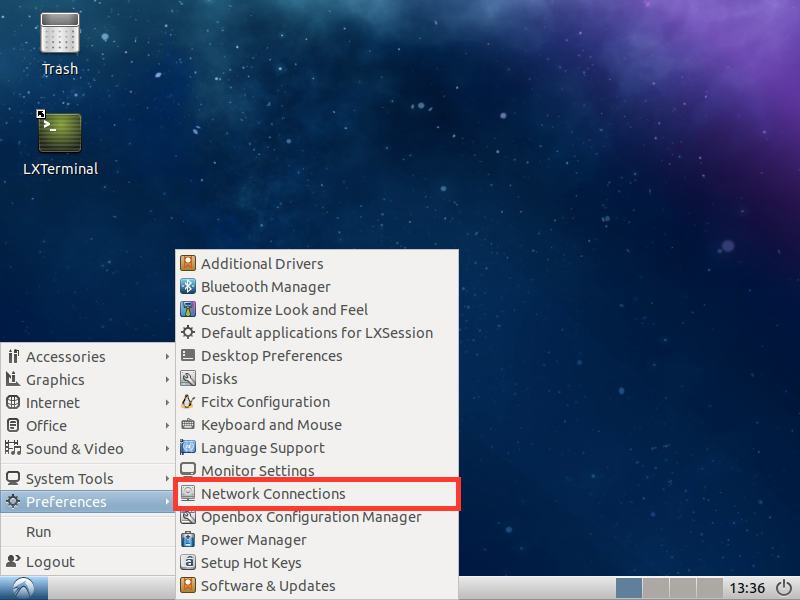
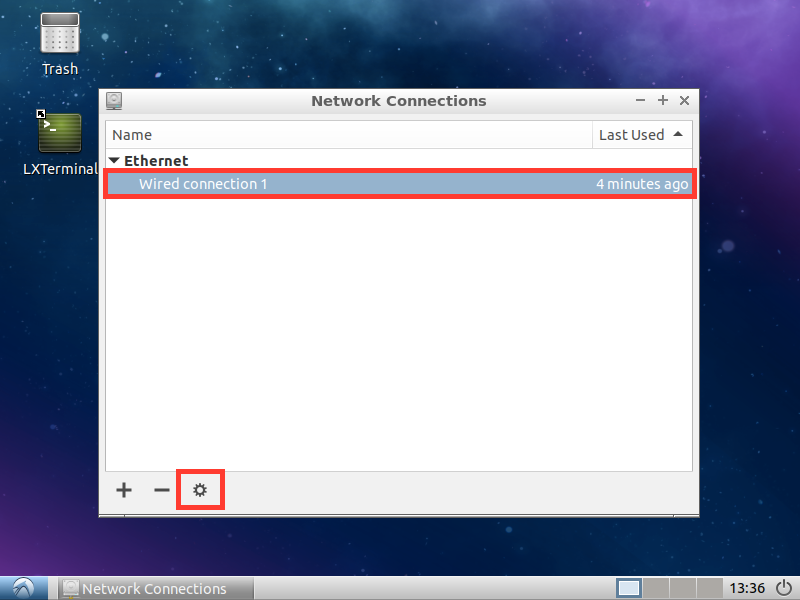
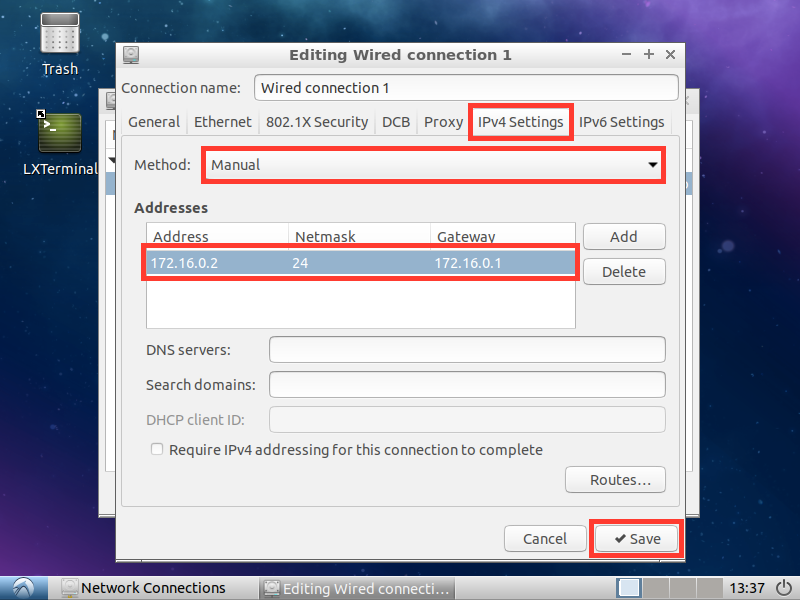
The IP address, its netmask and the gateway address are depend on the topology you create in the assignment 4. Please be careful.
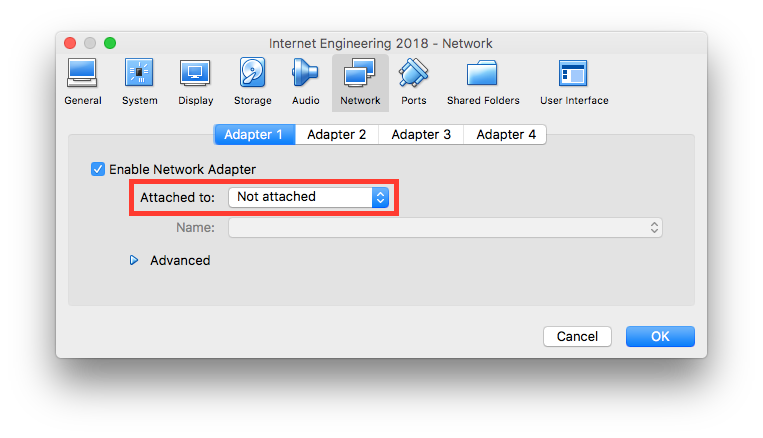
After that, shutdown the virtual machine and set the network adapter 1 to unattached in order to connect the router on GNS3, as the image bellow:
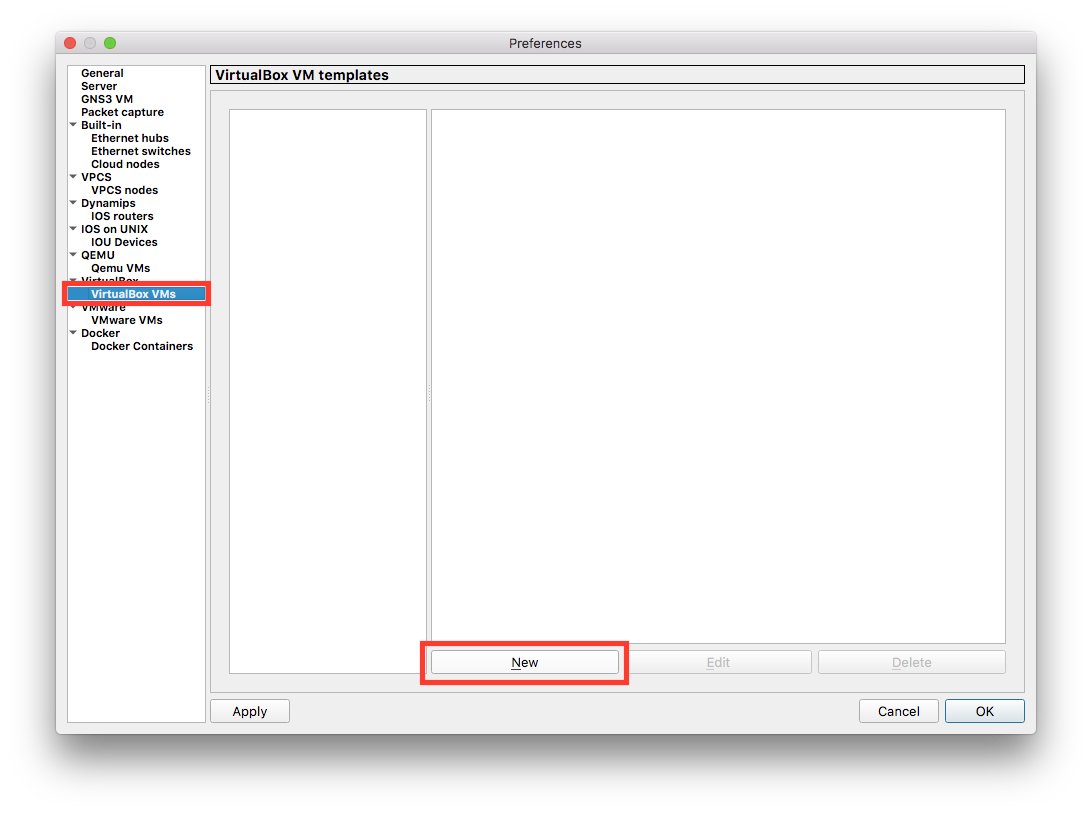
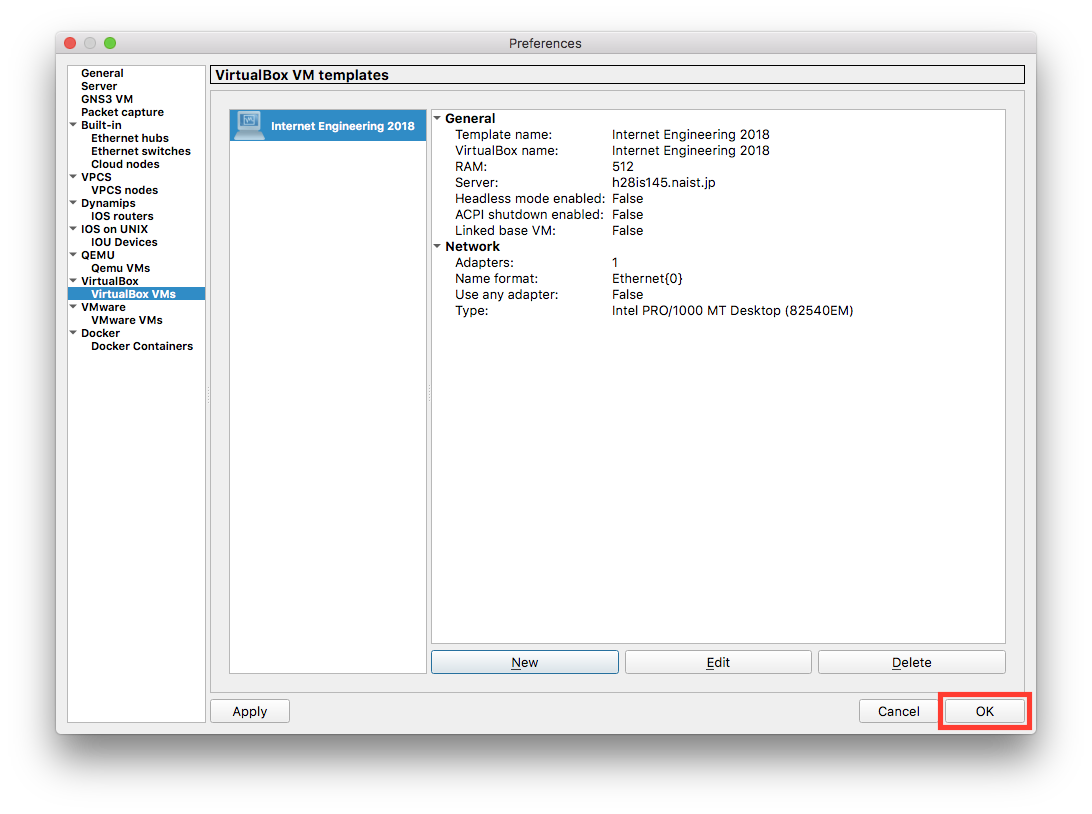
Next, make the virtual machine available on GNS3. Open Preferences, select VirtualBox VMs, click New:
Make sure that the virtual machine we provided is selected. Then, click Finish:
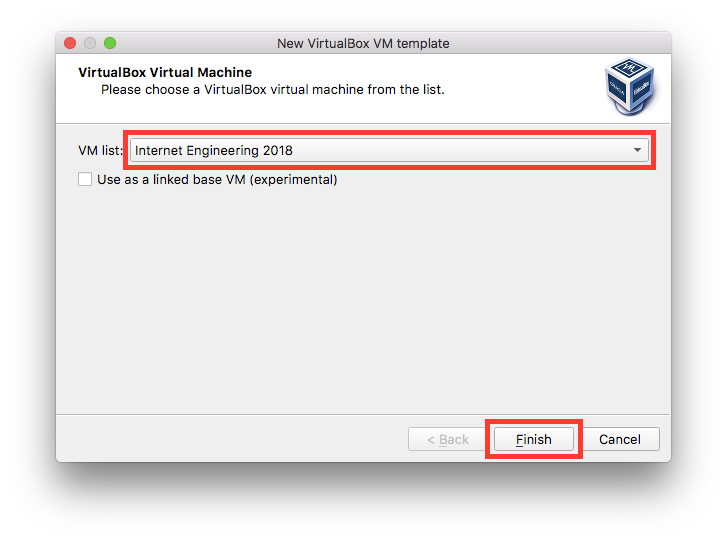
The Preferences window will be display the information of the virtual machine.
Add a virtual machine to the network topology on GNS3 and connect it with the router.

Step 2. Configure SNMP Servers
Start all nodes on GNS3 and open the consoles of all routers. Configure SNMP servers on all routers:
R1#configure terminal
R1(config)#snmp-server community public ro
R1(config)#end
R1#copy running-config startup-config
Step 3. Query SNMP Servers
Let’s query SNMP servers (i.e. routers) from the virtual machine! Please open the terminal on the virtual machine.
For example, to get a description of all the interfaces of R3, find the name of the desired variable referring RFC 2863:
ifDescr OBJECT-TYPE
   SYNTAX  DisplayString (SIZE (0..255))
   ACCESS  read-only
   STATUS  mandatory
   DESCRIPTION
           "A textual string containing information about the
           interface.  This string should include the name of
           the manufacturer, the product name and the version
           of the hardware interface."
   ::= { ifEntry 2 }
You can find ifDescr as a variable name, so translate it to the corresponding OID:
$ snmptranslate -Ts | grep ifDescr
.iso.org.dod.internet.mgmt.mib-2.interfaces.ifTable.ifEntry.ifDescr
$ snmptranslate -On .iso.org.dod.internet.mgmt.mib-2.interfaces.ifTable.ifEntry.ifDescr
.1.3.6.1.2.1.2.2.1.2
…or you can get the OID directly from the variable name:
$ snmptranslate -Of -IR ifDescr
.iso.org.dod.internet.mgmt.mib-2.interfaces.ifTable.ifEntry.ifDescr
$ snmptranslate -On -IR ifDescr
.1.3.6.1.2.1.2.2.1.2
Then, try to execute the snmpwalk command specifying the community name public, the OID 1.3.6.1.2.1.2.2.1.2, and R3’s IP address 172.16.2.1:
$ snmpwalk -v 2c -c public 172.16.2.1 .1.3.6.1.2.1.2.2.1.2
iso.3.6.1.2.1.2.2.1.2.1 = STRING: "Ethernet0/0"
iso.3.6.1.2.1.2.2.1.2.2 = STRING: "GigabitEthernet0/0"
iso.3.6.1.2.1.2.2.1.2.3 = STRING: "GigabitEthernet1/0"
iso.3.6.1.2.1.2.2.1.2.4 = STRING: "GigabitEthernet2/0"
iso.3.6.1.2.1.2.2.1.2.5 = STRING: "GigabitEthernet3/0"
iso.3.6.1.2.1.2.2.1.2.6 = STRING: "GigabitEthernet4/0"
iso.3.6.1.2.1.2.2.1.2.7 = STRING: "VoIP-Null0"
iso.3.6.1.2.1.2.2.1.2.8 = STRING: "Null0"
iso.3.6.1.2.1.2.2.1.2.9 = STRING: "Loopback0"
In the same way, to retrieve the interface ID list, execute the snmpwalk command with the OID 1.3.6.1.2.1.2.2.1.1 referring RFC 2863:
$ snmpwalk -v 2c -c public 172.16.2.1 .1.3.6.1.2.1.2.2.1.1
iso.3.6.1.2.1.2.2.1.1.1 = INTEGER: 1
iso.3.6.1.2.1.2.2.1.1.2 = INTEGER: 2
iso.3.6.1.2.1.2.2.1.1.3 = INTEGER: 3
iso.3.6.1.2.1.2.2.1.1.4 = INTEGER: 4
iso.3.6.1.2.1.2.2.1.1.5 = INTEGER: 5
iso.3.6.1.2.1.2.2.1.1.6 = INTEGER: 6
iso.3.6.1.2.1.2.2.1.1.7 = INTEGER: 7
iso.3.6.1.2.1.2.2.1.1.8 = INTEGER: 8
iso.3.6.1.2.1.2.2.1.1.9 = INTEGER: 9
When you want to check the status of “GigabitEthernet0/0” (ID: 2) on R3, try to execute the snmpget command with the OID 1.3.6.1.2.1.2.2.1.7.2:
$ snmpget -v 2c -c public 172.16.2.1 .1.3.6.1.2.1.2.2.1.7.2
iso.3.6.1.2.1.2.2.1.7.2 = INTEGER: 1
For “GigabitEthernet3/0” (ID: 5), with the OID 1.3.6.1.2.1.2.2.1.7.5:
$ snmpget -v 2c -c public 172.16.2.1 .1.3.6.1.2.1.2.2.1.7.5
iso.3.6.1.2.1.2.2.1.7.5 = INTEGER: 2
According to RFC 2863, INTEGER: 1 means the interface is up, INTEGER: 2 means the interface is down, respectively:
ifAdminStatus OBJECT-TYPE
   SYNTAX  INTEGER {
               up(1),       -- ready to pass packets
               down(2),
               testing(3)   -- in some test mode
           }
   ACCESS  read-write
   STATUS  mandatory
   DESCRIPTION
           "The desired state of the interface.  The
           testing(3) state indicates that no operational
           packets can be passed."
   ::= { ifEntry 7 }
See Also
- Net-SNMP. http://www.net-snmp.org/docs/man/
- Manpage of SNMPTRANSLATE. http://www.net-snmp.org/docs/man/snmptranslate.html
- Manpage of SNMPCMD. http://www.net-snmp.org/docs/man/snmpcmd.html
- Manpage of SNMPWALK. http://www.net-snmp.org/docs/man/snmpwalk.html
- Manpage of SNMPGET. http://www.net-snmp.org/docs/man/snmpget.html
- RFC 1155 - Structure and Identification of Management Information for TCP/IP-based Internets. https://tools.ietf.org/html/rfc1155
- RFC 1156 - Management Information Base for Network Management of TCP/IP-based internets. https://tools.ietf.org/html/rfc1156
- RFC 2578 - Structure of Management Information Version 2 (SMIv2). https://tools.ietf.org/html/rfc2578
- RFC 1213 - Management Information Base for Network Management of TCP/IP-based internets: MIB-II. https://tools.ietf.org/html/rfc1213
- RFC 3418 - Management Information Base (MIB) for the Simple Network Management Protocol (SNMP). https://tools.ietf.org/html/rfc3418
- RFC 4022 - Management Information Base for the Transmission Control Protocol (TCP). https://tools.ietf.org/html/rfc4022
- RFC 4113 - Management Information Base for the User Datagram Protocol (UDP). https://tools.ietf.org/html/rfc4113
- RFC 4293 - Management Information Base for the Internet Protocol (IP). https://tools.ietf.org/html/rfc4293
- RFC 2863 - The Interfaces Group MIB. https://tools.ietf.org/html/rfc2863
- RFC 4133 - Entity MIB (Version 3). https://tools.ietf.org/html/rfc4133
- RFC 4268 - Entity State MIB. https://tools.ietf.org/html/rfc4268
- RFC 3877 - Alarm Management Information Base (MIB). https://tools.ietf.org/html/rfc3877
- RFC 4044 - Fibre Channel Management MIB. https://tools.ietf.org/html/rfc4044
- RFC 2837 - Definitions of Managed Objects for the Fabric Element in Fibre Channel Standard. https://tools.ietf.org/html/rfc2837
- RFC 2584 - Definitions of Managed Objects for APPN/HPR in IP Networks. https://tools.ietf.org/html/rfc2584
- Cisco IOS MIB Locator. http://mibs.cloudapps.cisco.com/ITDIT/MIBS/servlet/index